If you are using the built-in exposure meter of your camera and this has an integral and centre-accentuated metering system, please take care to focus the card in full format, otherwise the measuring will be wrong.
The color-grey card is a help in those situations where you require a
reference value for a correct reproduction. As you cannot take the object that
you want to photograph into the dark room for comparison, you just proceed the
other way round. Photograph the card on the spot together with your object and
then later compare your photograph in the darkroom with the original card.
More details follow.
As the card is used in the open air, high demands are put on its durability.
That is the reason why we have made it washable, strong and highly fade-resistant.
Nevertheless you should treat it with care. Exposure to the sun or other bright
light for some time does not harm it. Over longer periods, however, you should
keep it wrapped up to avoid colour changes over the years.
If the card has got dirty, wash it only with water and a little washing-up
liquid or, even better, with a plastic cleansing agent. Never use a solvent or
a detergent. Avoid scratches.
The card is intended to last a photographer's life-time.
You do not, however, have to be overcareful. The grey card can stand a lot.
For those of our customers who are irritated by the white border on the card,
we recommend the following: Slit the card on the back with a stanley Knife, then
you can break it; that way you can remove the white border. The card can also be
split in this way.
The white border is a result of production techniques and prevents wear of
the grey area.
There is a genuine grey and one that is not genuine. Under certain
circumstances you cannot differentiate the two visually.
Genuine grey has a diffuse reflection independent of the wavelength of the
illumination, as achieved nowhere as ideally as by the FOTOWAND-Grey-card .
In other words: The same percentage of light is reflected, independent of
the light con ditions, independent of the colour of the light. A non-genuine
grey, however, can have a strong varying remisson, i.e. the light can be
reflected differently according to the colour of the light.
Under certain light conditions genuine and non-genuine grey can seem identical. Seen under different light the difference appears. The neutral grey is an absolute value.
The exposure meters of most cameras are set to an average value, the middle
grey value, also called neutral grey. It corresponds to the average
distribution of light of most subjects.
As those values are only average values, these meters are bound to fail in
non-average situations. A pale complexion or a winter landscape is inevitably
reproduced too darkly; a dark complexion or a twilight atmosphere too lightly.
Most photographers come across this phenomenon when the shining white winter
landscape turns out as the most dirty grey.
The exposure meter shows a value which makes the area in question grey;
black turns to grey, i.e. too light, white also turns to grey, i.e. too dark.
The grey card has to be placed next to the object facing the camera. In the
case of a strong deviation of light direction - that is, the direction of the
object to the strongest source of light: sun, sky, lamp - from the shooting
direction; for example when the sun comes from the side, you hold the grey card
between camera and main light source; that is, at an angle in the
middle of both directions.
Always hold the exposure meter at a distance of 7 to 10 inches in front of
the grey card without throwing a shadow on it.
If you are using the built-in exposure meter of your camera and this
has an integral and centre-accentuated metering system, please take care to
focus the card in full format, otherwise the measuring will be wrong.
We presume a normal range of subjectcontrast of 1:32.
To enable a comparison of exposures despite different contrast ranges, the
exposure meter of the cameras were set to the average value of contrast range.
This results in an average grey value (our neutral grey) of densitiy of ND = 0,75 (resp. a transmisson or reflection of 17,68 %).
Here is the formula for those who want to know how to work that out:
The average density can be regarded as a log. of the reciprocal value of the reflection.
Place a photograph of the grey card taken under the same light conditions
in front of every series of photographs. This should neither be overshadowed
nor brigthened up.
This photograph is an objective value as you have now as it were stored the
light conditions.
In processing you should use your working results (exposure and developing
time) to achieve the reproduction corresponding exactly to the grey value. You
should put attention mainly on the density and try to reach an aproximate grey.
Last color deviations you should remove in the further step.
For that you should do four partexposures, respectively with double time
or half the blind.
Through comparison with the original card you will find the correct value.
The two big fields ± 5/10 Dens will give you a help of orientation. ± 5 log
Dens corresponds 1/6 blind or time value. If you remain in between the tolerance
of this densityfields you will be very close to the right value.
Next steps follow.
The above described working results of your referencecard photograph have
given you the values for setting your exposure timer. Place the measuring probe
of the timer under the projection of the negative of the referencecard and set
the time that you have determined in the course of your test enlargement. Now
set the instrument to mid-zero with the control for the paper guide value. Thus
you have achieved the testing of the paper guide value.
Take a note of the value, it is relevant for the paper used.
From then on you need not work out the grey card photograph every time you take a series of photographs under different light conditions. You just set the determined paper guide value, place the measuring probe on the enlarger easel and then set the correct exposure time with the time control by setting the meter to mid-zero. This time value is valid for the whole following series of photographs.
One can see colour casts easily in neutral grey.
Our eyes react more sensitively to neutral grey than to colours. This is due
to the adaptability of our eyes, their aim being to produce the complete
totality of colours.
Every extreme stimulant disturbing this balance is weakened in the direction
of grey.
That way we can differentiate well fine shades of pale colour or various
shades of grey.
We see them almost like under a magnifying lens.
Shades of stronger colour are much harder to differentiate. That is why
colour photographs do not have to be so exact (a fact that some colour film
manufacturers make use of in their advertising campaign). Well balanced and
finely adjusted colour compositions are, however, harmed by the slightest
deviation.
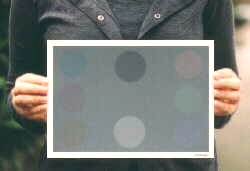
Each of the 6 colourfields have a deviation of ±5 (resp. ±10) dens from
neutral grey in its direction.
Watch the fields closely and remember how they are titled (left Y/M/C,
right O/G/V). So you can realize the tendency of the deviation easier.
Find the correct working values again, this time the correct filtering.
Colour saturation (exposure time) and colour cast (filter) you can easy
realize. The teststrips for searching the correct exposuretime determines
almost the direction. Do some teststrips until you will reach the tolerance of
the six colourfields.
Try to achieve the correct value of the neutral grey, after analysing the
remaining colour deviation through comparison.
Colour deviation (shift) will be more apparent in darker images compared with lighter ones. For this reason we recommend that density be corrected before colour deviations.
Make use of this fact of natural science if you are not able to reach the solution of a difficult photograph. Do a print lightly underexposured, it looks sometimes better.
The exact filtering gives you the optimal basic filtering for all succeeding photographs of this series. For the correct setting of your exposure timer you now have to calibrate it again.
Take a colourgrey card photograph taken at a standard value corresponding to
5500° Kelvin colour temperature. Most electronic flashes produce such a
light. The correct filtering of this standard light grey card photograph gives
you the basic filtering.
Or use an idealnegativ, i.e. our Colour-Gray-testslide
When using Positiv-Analyzers we recommend additionally our standard strip for the TPA DES 100 (EICHFOLIE)
Although it is customary to zero densitometers to white, we recommend the
zeroing to neutral grey, as you then have an exact reference value.
White is not usually pure white and not light enough. You have to reckon
with minus-values, correct white would have the converson factor -0,75. White
is usually a bit above that, e.g. 0.07, then you'd have the converson factor
-0.68 etc.
To avoid constant calculations you can determine your value for white once
and then set your densitometer especially to 0.07 for white instead of zero.
That way you avoid a displacement of the whole scale.
Attention: Densitometer-values are not in all cases compatibel!
To compare its values the densitometers must have unanimous technical
features:
![]()
No part of this application may be copied or reproduced in any form or
by any means without the prior written conset of FOTOWAND-Technic.
The reference card may only be pictured as a reference by working out your
own pictures.
Every lownstanding reproduction of the reference card, especially doing of
testprints for business distribution or trade based on its reproduction needs
the written conset of FOTOWAND-Technic (Germany).